The final article in this weekend’s Jonas Dupuich triple play. If anyone has photos from this demo that they’d like to share, mbcweb@marinbonsai.org is the place to send them. Ed. 5/20/19
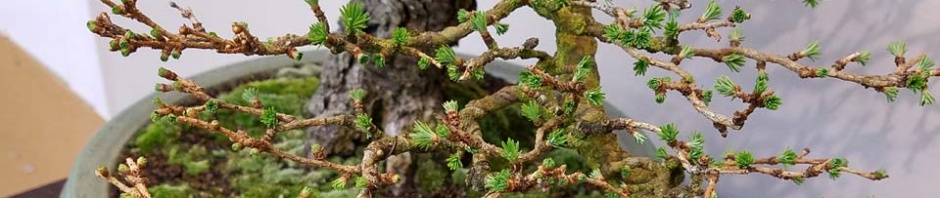
Giving us our first presentation at our new regular meeting venue, the Terra Linda Community Center, Jonas Dupuich, bonsai expert extraordinaire and the creator of bonsaitonight.com, brought a bunch of pines with him, young and old, to give us a lesson on how to create exposed-root pine bonsai. Jonas has been working with pines for 25 years, so his love for the trees and vast knowledge of what works best for them readily shows whenever he does a demonstration with them. Jonas brought, and works with, mostly black pines, but he also brought a red pine, and the exposed-root procedures he was talking about this night definitely apply to all pines.
To start off the night with a little observational education, Jonas showed slides of exposed-root bonsai examples from the “Green Room,” the sales area of Japan’s famous Kokufu show. There were a lot of extreme examples in the slides, and Jonas asked for audience feedback regarding what looked good and what did not. Exaggerated or excessive twists and turns did not rate very well, and neither did those that were too straight or two angled in places. These opinions all made sense under the general tenet that bonsai should look as natural and believable as possible. If it’s obvious that your bonsai has been through an extreme manipulation, then that manipulation was probably unsuccessful.
Next Jonas transitioned into the how-to portion of the night by showing a final few slides of various trees being subjected to his root manipulations. It was especially interesting when we got to see a photo or two of the process for trees that were there that night, so that we could see the ultimate results. Some had been started a few to five years ago, others just hours before Jonas left his workshop to come to us.
Jonas’ basic technique for producing exposed roots on pine trees is to take a young pine seedling and plant it at the top of a tall tube, which is then cut away slowly over multiple seasons until the roots of the tree are eventually exposed, preferably after they have developed some eye-catching artistic girth. There are, of course, a few more details . . .
For instance, the planting “tube” can be anything that is sturdy enough to hold your soil, but destructible, or deconstructible, enough that you can cut it away or remove sections of it from top to bottom. Something fancy might be interlocking wood or sheet metal sections that could be removed one-at-a-time, something basic might be stove piping or some other venting material. But Jonas’ new favorite tube material is discarded nursery containers, specifically the medium size in which you might get a very young tree, small houseplant, or a tomato or herb starter. He cuts the bottoms out of a bunch of them, nests them into one another, which they’re designed to do already, and straps them together with duct tape. It’s not pretty, but it’s highly functional, and a very good reuse of something a person like Jonas has in abundance.
Jonas made one final point before starting in on a demonstration of his exposed-root pine planting technique. He said that it’s best to start with a relatively young, but not too young, tree. The roots on an older tree may not be flexible enough to bend around as you put them in the tube, and younger roots may not be interesting enough. Starting with somewhat developed roots is important because your results depend a great deal on what you’ve already got. That’s because you cannot manipulate the roots very much while they’re developing. Jonas talked about poking chopsticks into the roots to move them around a bit, but said that ultimately you’re limited by the fact that the roots are connected at the top and the bottom, so you’re not going to be creating any root braids or anything like that. His final answer for the best age tree to use: around 10 years old.
To begin the actual demonstration portion of the night, Jonas produced a pre-prepared tube made from stacked-and-bound nursery containers and poured two types of soil into the tube in three distinct layers. He began with a small amount of regular bonsai soil at the bottom, to feed the roots where they’ll ultimately proliferate, then filled most of the rest of the tube with large pumice. He then asked for a volunteer to help him, and Belinda Lee came forward to hold a young tree in place at the top while Jonas put in more of the pumice, until it just partially covered the very bottoms of the roots. Finally, he put more regular soil on the very top, to feed the roots until they begin to grow down toward the bottom. Why large pumice? Large pumice serves as a sort of jungle-gym for roots, providing them something relatively large and impenetrable to have to weave around as they grow, giving them as much interesting waviness as possible. Lava rocks would also work, but are much heavier.
After you have successfully planted a pine in this way, your only real job for the next year is to help the tree grow. After its first year in the tube container, the tree may be ready for a single wire, to begin to define the trunk. Jonas is a big fan of putting extreme curvature into a tree’s trunk very early on, mostly because very few bonsai styles call for a straight trunk. Also, they look exaggerated at first, but remember that a tree’s curves will become more subtle as the trunk fattens and elongates.
Next Jonas started demonstrating tearing away the tubular container to expose the roots on a tree further along than the demonstration tree he had just constructed. He pointed out that the tree to be raffled that night was ready for this stage. Any type of scissors work to cut away the plastic he used to make his nested container tube. You will have to make sure you can similarly deconstruct whatever you use to create your own cylindrical containers. Ideally, you should be able to expose just a little bit at a time, from the top down, because the roots will fatten and form a tough exterior slowly in the same direction, and will do so more rapidly if you expose them at the right time in their thickening. If done correctly, you may end up progressing stepwise for up to a few years to completely tear away the container.
Whether you did a little at a time or waited a good long time and tore the container away all at once, the next step is to relatively carefully pick the soil out from around and between the roots. Jonas has found that the best tool for that is a Phillips screwdriver, or something similarly poky yet not sharp. Ice picks, awls, and aluminum chopsticks work, though the first two might cause too much damage if you inadvertently stab your roots. Wooden chopsticks break too easily. Root hooks are also useful, particularly if you want to use their angle to get good leverage to do some prying.
Be prepared for the possibility that you will be exposing the roots too early. If they’re starting to look too skinny, or if you purposely looked early to manipulate the roots, you can re-cover them by using a large sheet of the plastic mesh we use for drainage screens to build a replacement tube/fence around the roots, which you can then fill with new large pumice.
To wrap things up, Jonas discussed some things that can be done once the root exposing stage has begun. For one, you can begin cutting back to encourage denser growth. As Jonas mentioned in his November 2018 talk all about pines, you can cut back extra-far below the candles at decandling time to induce budding from the needles. Yes, new branch budding. Jonas calls this “cutback decandling,” but he’s open to a better term if anyone has one. He added some clarification regarding needle buds and their ability to produce new branch shoots instead of needles: it takes a lot of the tree’s energy, so time your cutback decandling right and make sure there isn’t too much competition from other areas of the tree.
Jonas provided plenty more tidbits throughout his talk, too many to list here entirely (you really must come to these talks if you aren’t already!), but one of his more fascinating digressions was an explanation of the benefit of growing bonsai in collanders while they’re in early and mid-development. For those of you who don’t already know, Jonas has always been a proponent of growing young bonsai in common plastic kitchen collanders, and many of our members and colleagues in other clubs have tried it with great success. The general consensus has been that the trees grow more vigorously in collanders because their roots don’t run into a solid wall like they do in a regular pot, something that was believed to cause the trees to “decide” that their days of growing bigger are over, or a similar simplified rationale based on the confining nature of the container. Despite our agreement on the benefits of growing in collanders, I doubt many of us knew the precise reason why they make a difference. Jonas explained that the collanders improve tree vigor and fullness mostly by increasing root division, not simply because their roots are getting more air through the holes (though that has benefits of its own). What happens in a regular pot when a root hits the wall is that the root simply turns and follows the wall, becoming the spiraling roots we’ve all seen, telling us we waited too long to repot. In a collander, however, when a root reaches the edge, the tip dies off when exposed to open air, and then the root divides further back, just like a pruned branch. Because the top of a tree is a reflection of the roots, more division in the roots ultimately leads to more ramification in the branches. Thus, the same reason we prune out the larger roots in favor of finer ones at repotting time is also the reason why collanders make good containers for developing bonsai. Many fine roots good, few fat roots bad. Except those roots you want exposed, of course.
The lucky winner of the future exposed-root pine, and the demo tree as well, raffled at the end of the night, was George Haas. Congratulations, George! We all look forward to seeing how those roots look some day.
– David Eichhorn